Content Standards (California)
Visual/Performing Arts:
3.1.4: Compare and contrast two works of art made by the use of different art tools and media (e.g., watercolor, tempera, computer).
3.2.6: Create an original work of art emphasizing rhythm and movement, using a selected printing process.
4.1.2: Describe how negative shapes/forms and positive shapes/forms are used in a chosen work of art.
4.2.6: Use the interaction between positive and negative space expressively in a work of art.
4.2.7: Use contrast (light and dark) expressively in an original work of art.
6.5.3: Create artwork containing visual metaphors that express the traditions and myths of selected cultures.
Materials
Big hard 1.5″ wolf’s hair brush
Small hard 1/2″ wolf’s hair brush
2″ sheep’s hair brush
Bottle of black liquid ink made in China or Japan
Absorbent rice paper
White dishes 4″ in diameter in plastic or ceramic
Water container
Lotus Illustrations 1-4 (see downloads)
Procedure
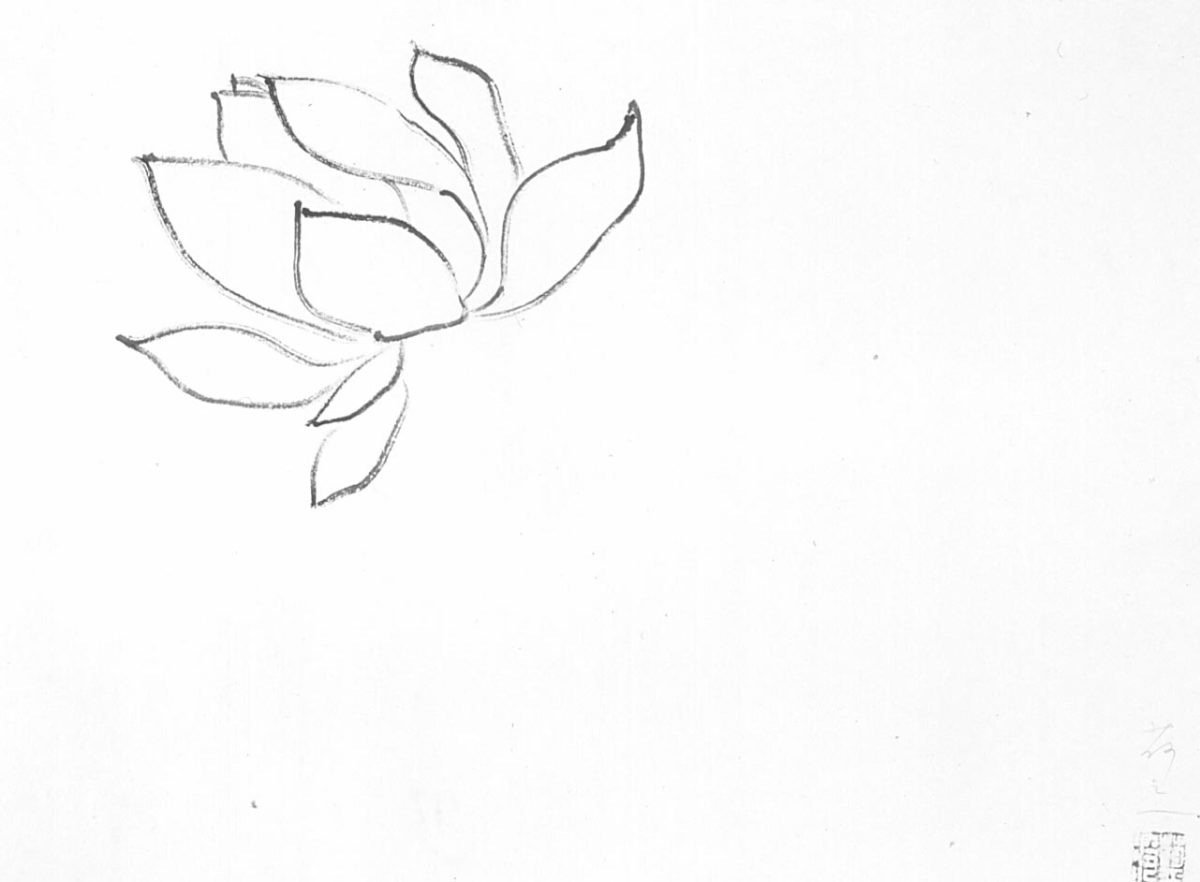
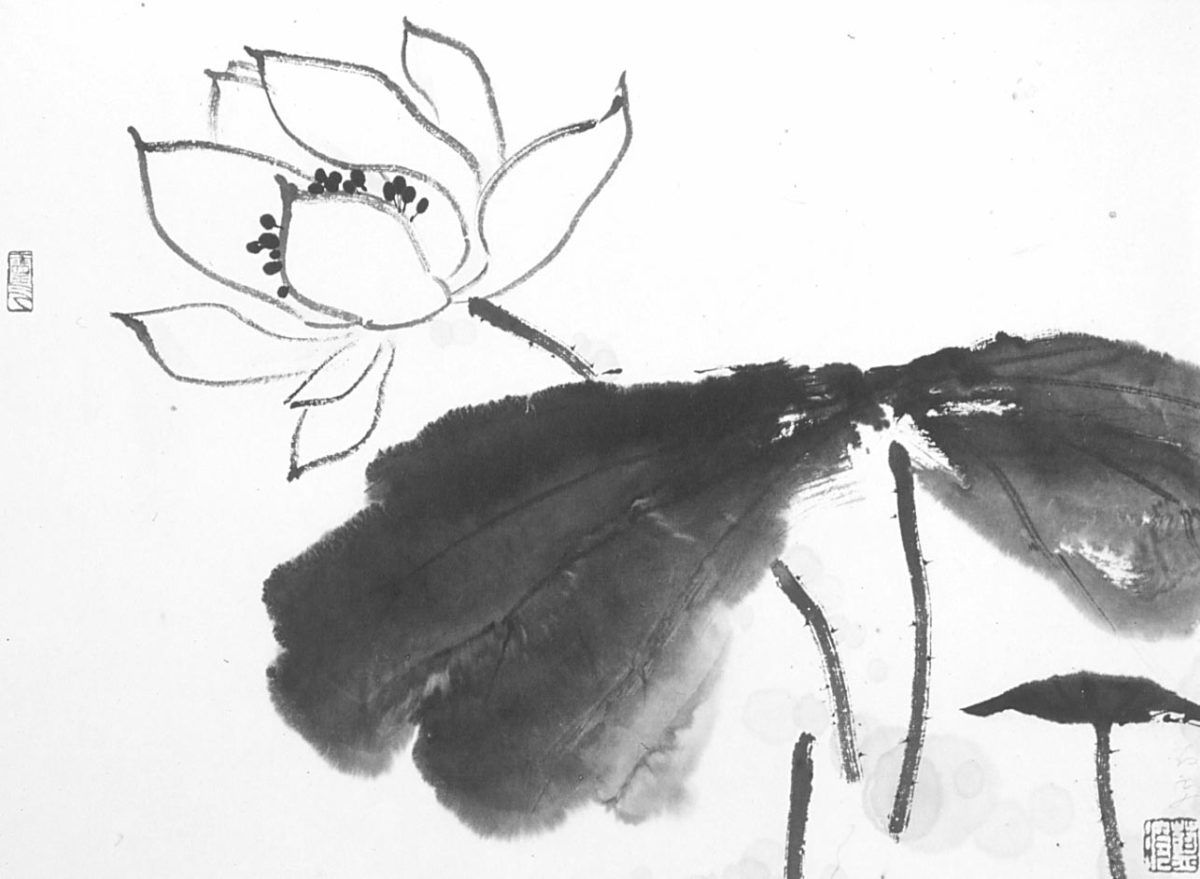
Petals (Illustrations 1 and 2)
- Use the large, hard brush and wet the brush completely. Then dry it on the edge of the water jar. Pour ink into the ink dish. Pick up some ink with the large, hard brush and use a different dish to dilute it with a small amount of water to create a light gray ink.
- Load the entire brush evenly with the gray ink. Dry the brush well on a paper towel so that you can create dry, gray strokes. Hold the brush low, near the tip, and keep the brush vertical for all of the outlining strokes.
- Practice the stroke before beginning. Note that each of the lotus outline strokes is done this way:
- Keep the light gray ink on the brush; before starting the stroke dip the tip of the brush into a little darker ink.
- Start each stroke by a reverse movement, moving upward for about 1/8″ before coming down. Do this for all lines. Move the entire arm and hand to draw each stroke. This is important to Chinese brushpainting. Do not use only your wrist or fingers to move the brush. Even if you rest your hand on the paper for doing detailed work, you need to move the entire arm to make the stroke. The energy and control expressed in Chinese brush strokes comes from using the entire arm, sometimes the entire body.
- The strokes always go from the tip of the petal toward the center of the flower.
- As you do the petals, note that you break down the contour into several strokes. Do not attempt to do each petal with one stroke.
- Do not trace the shape, but try to vary the speed of the strokes so that you can get dry and wet effects. This will create a rhythm and expressive quality in your work.
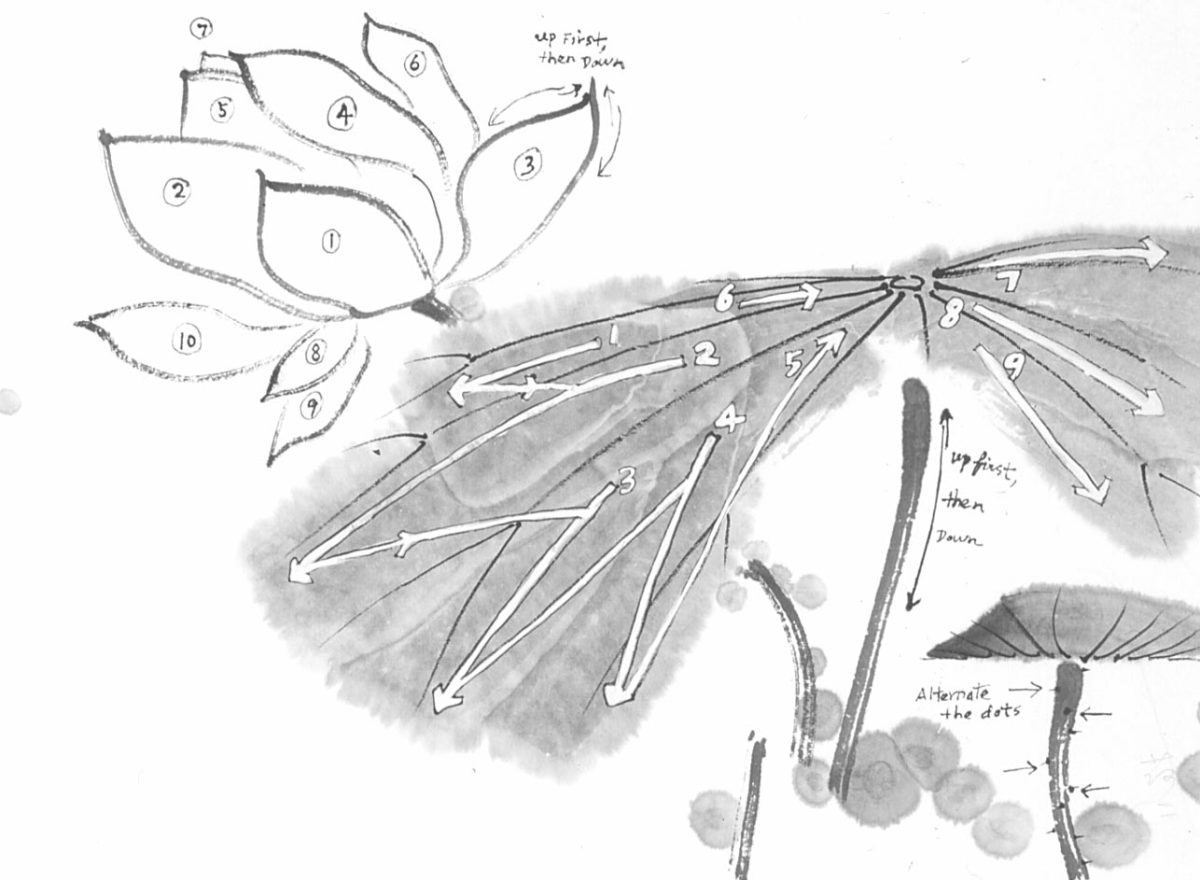
- Begin with the petal labeled “1” on Illustration 2. This petal is done using three strokes. Note the difference in the curves on the left and right sides of the petal.
- The next petal (labeled “2” on Illustration 2) becomes more dry and uses less pressure as it approaches petal 1. This gives the illusion that it is behind the first petal. This is true of all the
petals.
- Draw all ten petals of the lotus, doing them in the order indicated on Illustration 2.
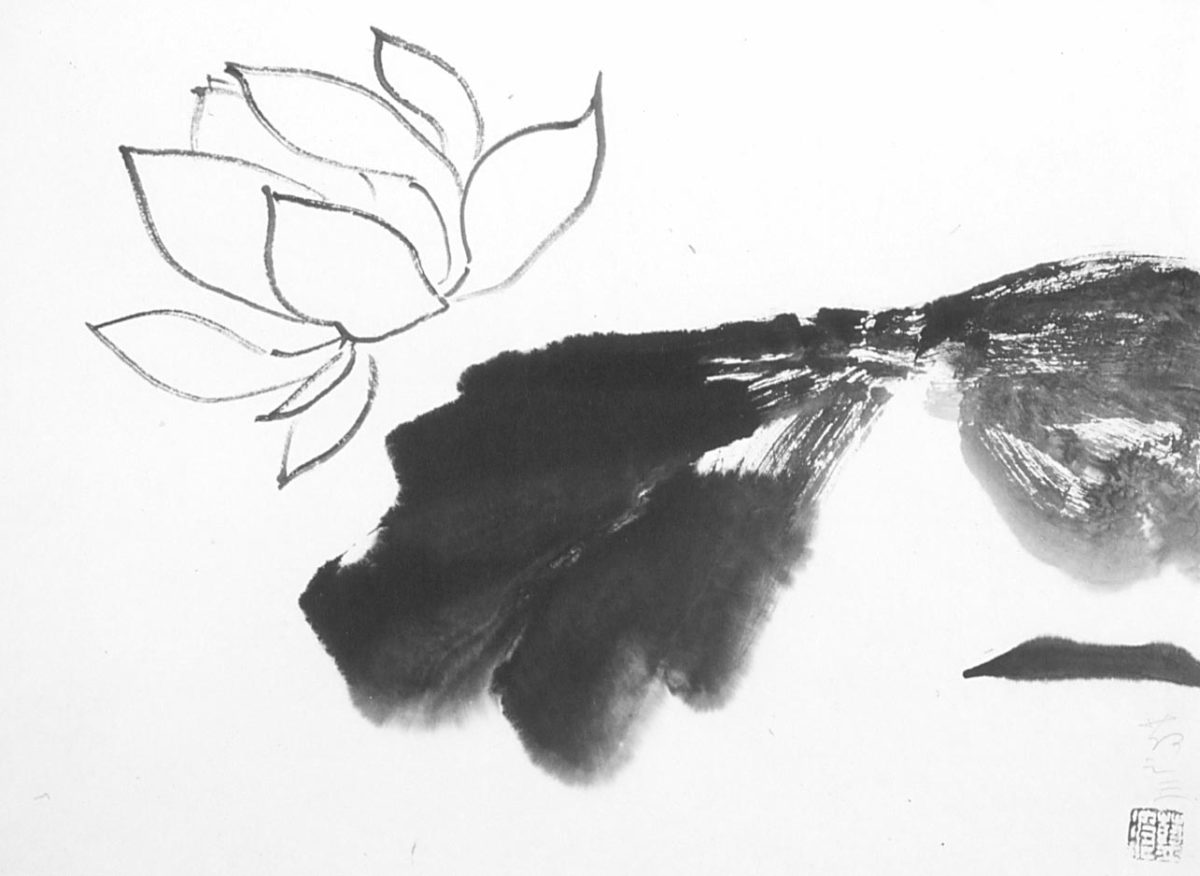
Large Leaf (Illustrations 2 and 3)
- Use a large, soft brush and load it thoroughly in the dark gray ink. You will want a wet brush for these strokes.
- Before you start the first stroke of the leaf, dip the tip in the black ink. Use the side of the brush, not the tip. Lay down the brush with the tip facing the top edge of the paper. Place it in the upper left corner of where the leaf will be, where it says “1” on the leaf strokes.
- Move the brush in the path indicated for strokes 1 through 4 on the Illustration 2 leaf. Make these strokes in one continuous zigzag motion, without lifting the brush from the paper.
- Notice how the darker ink at the tip of the brush creates variation on the leaf when you use the side of the brush to paint. Notice that the edges on the lower left of the lotus leaf are definite and not simply diffused where the ink has run. The right edge of these strokes is softer and diffused.
- When the brush is more dry, continue with strokes 5 and 6. Notice where the brush strokes start and end, marked on Illustration 2.
- Add a little more ink to the tip of the brush before doing strokes 7, 8, and 9.
- Notice as you work that the top edge should be more flat and sharply defined, compared to the bottom edge of the leaf. This is how the lotus leaf appears from the side. Moreover, this adds an important contrast and variation of edges.
Small Lotus Leaf (Illustrations 2 and 3)
- Change to the large, hard brush and load it with gray ink.
- Dip the tip of the brush in darker ink just before beginning the stroke.
- This stroke begins using the tip of the brush. Then you press and angle the brush to use the side for the broader section of the leaf. Return to the tip of the brush by turning the bristles counterclockwise and gradually moving the brush back to the vertical position to finish the stroke.
Veins on Leaf (Illustrations 4 and 2)
- Use a small, hard brush with undiluted ink. Dry the brush well before loading ink so that you can achieve a dry, sharp stroke.
- Paint the veins while the ink on the leaf is still a little wet to show that the veins blend with the leaf, but do not do them immediately after you paint the leaf, while the paper is still saturated. Otherwise ink for the veins will be too diffused.
- Paint the center circle of the leaf first.
- Paint the veins with the same sort of stroke used for the petals.
- Notice the spacing and shape of the veins in Illustration 2. The veins are not parallel to each other, but radiate from the center. Your actual stroke, however, should fuse into the leaf you have already done, as in Illustration 4.
- On the small furled leaf, the veins go from the bottom to the top edge of the pod. Notice that the veins are not parallel. These veins are emerging and radiating from the center around the stem as well.
Stamen (Illustrations 4 and 2)
- Use a small, hard brush and load it with wet dark ink.
- Create oval dots for the stamen. Do this by using the tip of the brush and applying a small pressure.
- The oval marks should not be scattered. Rather, they come from the center of the flower and appear to come from behind the petal.
- The grouping is important. The oval marks should be clustered more in some areas than other. Be aware of the relationship of the marks with the contour line defining the petal.
- Some of the marks are farther from the line, while others are closer.
- Altogether, the marks form a half-circle around the petal.
- After forming the oval marks, dry the brush and point the tip. Make very thin lines to indicate the stalks of the stamen. These should be oriented toward the center of the flower behind the front petal. Those oval marks that are next to the petal edge will not need such connections.
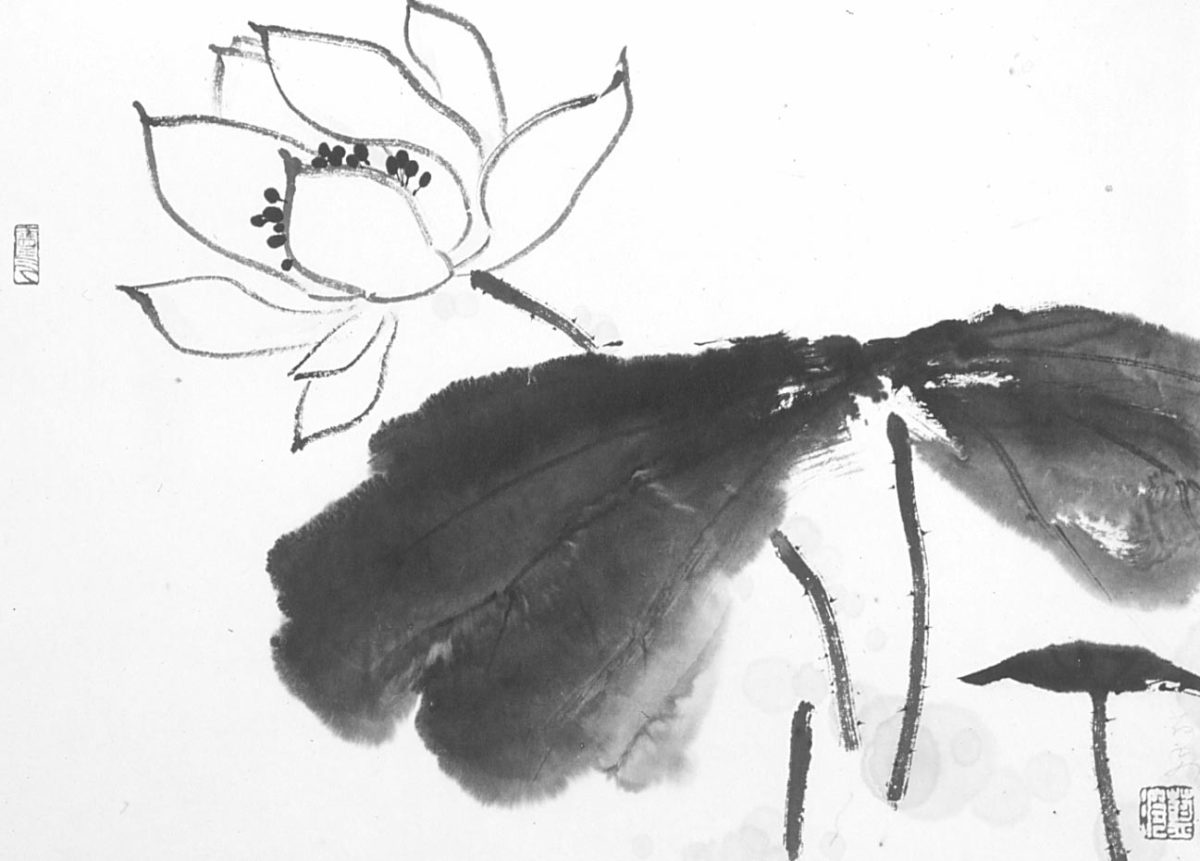
Dew Drops (Illustrations 2 and 4):
- Chinese artists will often use very faint gray dots to complete the composition of a painting. If asked what these represent, an artist might say they are “dew drops.” Their main function, however, is to unify the composition and create a sense of space behind the image. The overall placement of the dew drops should contribute to the “S” curve of the composition, helping to lead the eye along the path.
- Use a large, soft brush. The ink should be so diluted that it barely shows on the paper when it is dry. You might want to use the “dirty” water you have been working with as you have painted. Do not add more ink to this water.
- The “dew drops” are done in a darker ink on Illustration 2 so that you can see and consider their placement. Note the relationship of the dewdrops to the stems and to the space around them. The drops do not all line up. Some are on the left and others on the right of a stem. The drops also vary in size. There is a rhythm to their placement, so that they do not all march in a row. Instead, some are crowded together and others are by themselves.
Signature or Seal (Illustrations 2 and 4):
- A signature or seal, or in this case two seals, are used to enhance the composition. The seals might be the artist’s name, or they could be “leisure seals” (Xianzhang), expressing some philosophical view of the artist.
- The placement of the seals or signature helps achieve balance in the composition. There is no standard place to put the seal or signature.
- The seal and signature should follow the flow of the painting. This usually means it will be placed in a more active part of the painting rather than in an empty space.
Illustrations by Lampo Leong. Instructions by Lampo Leong with Diane Wang.